
Antrea is a Kubernetes networking solution intended to be Kubernetes native. It operates at Layer3/4 to provide networking and security services for a Kubernetes cluster, leveraging Open vSwitch as the networking data plane.
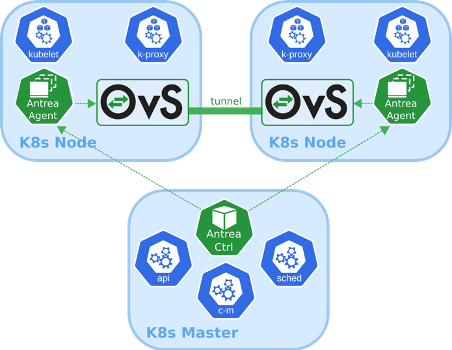
Open vSwitch is a widely adopted high-performance programmable virtual switch; Antrea leverages it to implement Pod networking and security features. For instance, Open vSwitch enables Antrea to implement Kubernetes Network Policies in a very efficient manner. Source: https://antrea.io/
In this blog I will explain how to test Antrea on your Mac laptop with easy steps. In addition, I will explain how to visualize Antrea health in Octant, which is a very easy to use opensource UI for K8s.
I will use Kind to run local K8s in my laptop. Luckily, the Antrea team already created a script for Kind that includes Antrea. I will start by deploying Octant
Deploy Octant
1. Install Octant on Macbrew install octant
2. Clone Octant git repo,git clone https://github.com/vmware-tanzu/octant.git
3. Create Octant test plugincd octant
go run build.go install-test-plugin
(if you don’t have go in your laptop, you can install it from https://golang.org/doc/install)
Above two steps are optional, but they will simplify adding Antrea Plugin later.
Deploy Kind with Antrea
1. Install Kindbrew install kind
2. Clone Antrea git repo,git clone https://github.com/vmware-tanzu/antrea.git
3. Create K8s Cluster,cd antrea
./ci/kind/kind-setup.sh create CLUSTER_NAME
Example./ci/kind/kind-setup.sh create k8s-with-antrea
That script will create a kind cluster with two worker nodes with Antrea already installed.
4. List your Kind K8s clusterkind get clusters
Kind will automatically include the created cluster to your default kubeconfig (typically ~/.kube/config)
5. Kind should automatically switch you to the newly created cluster context to access that cluster. To confirm that you can enter below command to view your context
$ kubectl config current-context kind-k8s-with-antrea
if you are in different context, you can switch to the newly created cluster
kubectl config use-context kind-k8s-with-antrea
6. Check that Antrea is deployed
$ kubectl get pods -n kube-system | grep antrea
kube-system antrea-agent-htkj4 2/2 Running
kube-system antrea-agent-kg9wg 2/2 Running
kube-system antrea-agent-swwc6 2/2 Running
kube-system antrea-controller-68bd797cb8-prnl6 1/1 Running
We should get three antrea-agents and one antrea-controller in Running state
Deploy Antrea Octant plugin
1. Download the plugin from
https://github.com/vmware-tanzu/antrea/releases/download/v0.8.0/antrea-octant-plugin-darwin-x86_64
2. Move the downloaded file to Octant default plugin folder. The folder was created when we created Octant test plugin. Here is how to do it from Terminalmv antrea-octant-plugin-darwin-x86_64 ~/.config/octant/plugins/
3. Make the plugin executablechmod +x ~/.config/octant/plugins/antrea-octant-plugin-darwin-x86_64
4. Export your kubeconfigexport KUBECONFIG=~/.kube/config
Run Octant
You can easily run octant by typing “octant” in your Terminal$ octant
That will open your default browser automatically on Octant
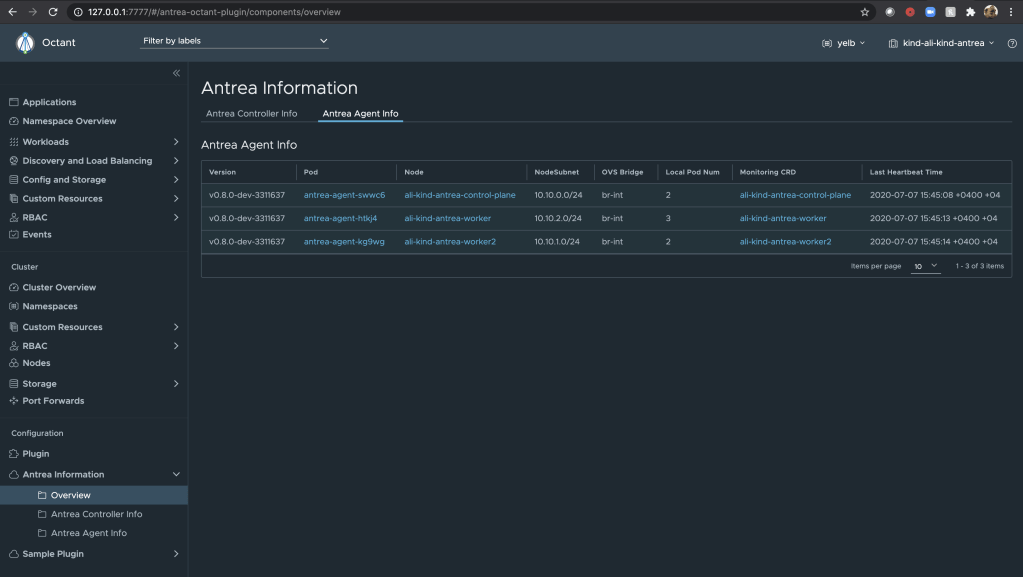
Antrea plugin could be seen under Plugins in the UI. Now we can check the health of Antrea components from Octant as shown above.
Test K8s NetworkPolicy with Antrea
To apply K8s NetworkPolicies, we need a CNI Plugin to enforce that policy. Antrea will play that role.
Let us deploy an application and test K8s NetworkPolicy with Antrea.
1. create a new namespace for the appkubectl create ns yelb
2. Create below YAML with your favorite Text Editor, and save it as rest-review.yaml
apiVersion: v1
kind: Service
metadata:
  name: redis-server
  labels:
    app: redis-server
    tier: cache
  namespace: yelb
spec:
  type: ClusterIP
  ports:
  - port: 6379
  selector:
    app: redis-server
    tier: cache
---
apiVersion: v1
kind: Service
metadata:
  name: yelb-db
  labels:
    app: yelb-db
    tier: backenddb
  namespace: yelb
spec:
  type: ClusterIP
  ports:
  - port: 5432
  selector:
    app: yelb-db
    tier: backenddb
---
apiVersion: v1
kind: Service
metadata:
  name: yelb-appserver
  labels:
    app: yelb-appserver
    tier: middletier
  namespace: yelb
spec:
  type: ClusterIP
  ports:
  - port: 4567
  selector:
    app: yelb-appserver
    tier: middletier
---
apiVersion: apps/v1
kind: Deployment
metadata:
  name: yelb-ui
  namespace: yelb
spec:
  replicas: 1
  selector:
    matchLabels:
      app: yelb-ui
  template:
    metadata:
      labels:
        app: yelb-ui
        tier: frontend
    spec:
      containers:
      - name: yelb-ui
        image: mreferre/yelb-ui:0.3
        ports:
        - containerPort: 80
---
apiVersion: apps/v1
kind: Deployment
metadata:
  name: redis-server
  namespace: yelb
spec:
  replicas: 1
  selector:
    matchLabels:
      app: redis-server
  template:
    metadata:
      labels:
        app: redis-server
        tier: cache
    spec:
      containers:
      - name: redis-server
        image: redis:4.0.2
        ports:
        - containerPort: 6379
---
apiVersion: apps/v1
kind: Deployment
metadata:
  name: yelb-db
  namespace: yelb
spec:
  replicas: 1
  selector:
    matchLabels:
      app: yelb-db
  template:
    metadata:
      labels:
        app: yelb-db
        tier: backenddb
    spec:
      containers:
      - name: yelb-db
        image: mreferre/yelb-db:0.3
        ports:
        - containerPort: 5432
---
apiVersion: apps/v1
kind: Deployment
metadata:
  name: yelb-appserver
  namespace: yelb
spec:
  replicas: 1
  selector:
    matchLabels:
      app: yelb-appserver
  template:
    metadata:
      labels:
        app: yelb-appserver
        tier: middletier
    spec:
      containers:
      - name: yelb-appserver
        image: mreferre/yelb-appserver:0.3
        ports:
        - containerPort: 4567
3. apply the yaml
kubectl apply -f rest-review.yaml
4. confirm the application is deployed as belowkubectl get pods -n yelb
NAME                                              READY STATUS RESTARTS AGE
redis-server-5b956cdfb-6f8gk        1/1       Running 0 43s
yelb-appserver-56998cb5d8-t6zv4 1/1       Running 0 42s
yelb-db-76fcfcbcc5-sszwm              1/1       Running 0 43s
yelb-ui-8576c9bfcf-9hr4k               1/1        Running 0 43s
If we dont deploy any NetworkPolicy in K8s, all pods could speak freely to each other
5. Access the application (copy the yelb-ui pod name from above)kubectl port-forward pod/yelb-ui-8576c9bfcf-9hr4k 5000:80 -n yelb
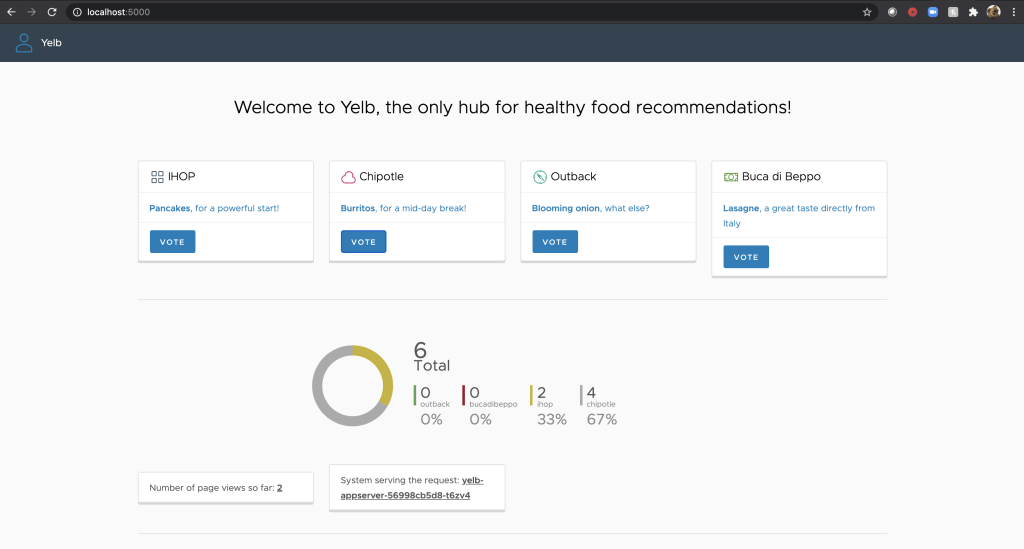
Open your browser on localhost:5000 and vote for your favorite restaurant
6. Ping between yelb-ui and yelb-appserver
First lets get the IP address of yelb-appserver$ kubectl get pods -n yelb -o wide
NAME READY STATUS RESTARTS AGE IP ...
redis-server-5b956cdfb-6f8gk 1/1 Running 0 9m36s 10.10.1.3
yelb-appserver-56998cb5d8-t6zv4 1/1 Running 0 9m35s 10.10.1.4
yelb-db-76fcfcbcc5-sszwm 1/1 Running 0 9m36s 10.10.2.4
yelb-ui-8576c9bfcf-9hr4k 1/1 Running 0 9m36s 10.10.2.3
Now let us try to ping yelb-appserver from yelb-ui (change yelb-ui pod name and yelb-appserver IP address based on previous outputs)
kubectl exec -ti po/yelb-ui-8576c9bfcf-9hr4k ping 10.10.1.4 -n yelb
64 bytes from 10.10.1.4: icmp_seq=0 ttl=62 time=2.258 ms
64 bytes from 10.10.1.4: icmp_seq=1 ttl=62 time=1.710 ms
7. Let us apply a NetworkPolicy between yelb-ui and yelb-appserver
First let us create a NetworkPolciy YAML. I am naming the file as yelb-netwrok-policy.yaml
apiVersion: networking.k8s.io/v1
kind: NetworkPolicy
metadata:
  name: yelb-network-policy
  namespace: yelb
spec:
  podSelector:
    matchLabels:
      app:  yelb-appserver
  policyTypes:
  - Ingress
  ingress:
  - from:
    - podSelector:
        matchLabels:
          app: yelb-ui
    ports:
    - protocol: TCP
      port: 4567
In this policy we are only allowing port TCP-4567 and blocking everything else including ICMP
Apply the yamlkubectl apply -f yelb-netwrok-policy.yaml
Check that the NetworkPolicy is created
$ kubectl get networkpolicy -n yelb
NAME POD-SELECTOR AGE
yelb-network-policy app=yelb-appserver 47s
8. Run the ping test againkubectl exec -ti po/yelb-ui-8576c9bfcf-9hr4k ping 10.10.1.4 -n yelb
you should not get any reply because of NetworkPolicy.
9. Test application againkubectl port-forward pod/yelb-ui-8576c9bfcf-9hr4k 5000:80 -n yelb
Open your browser on localhost:5000 and vote for your favorite restaurant.
The application should work fine which means Antrea is enforcing K8s NetworkPolicy and only allowing the port we need and blocking everything else.
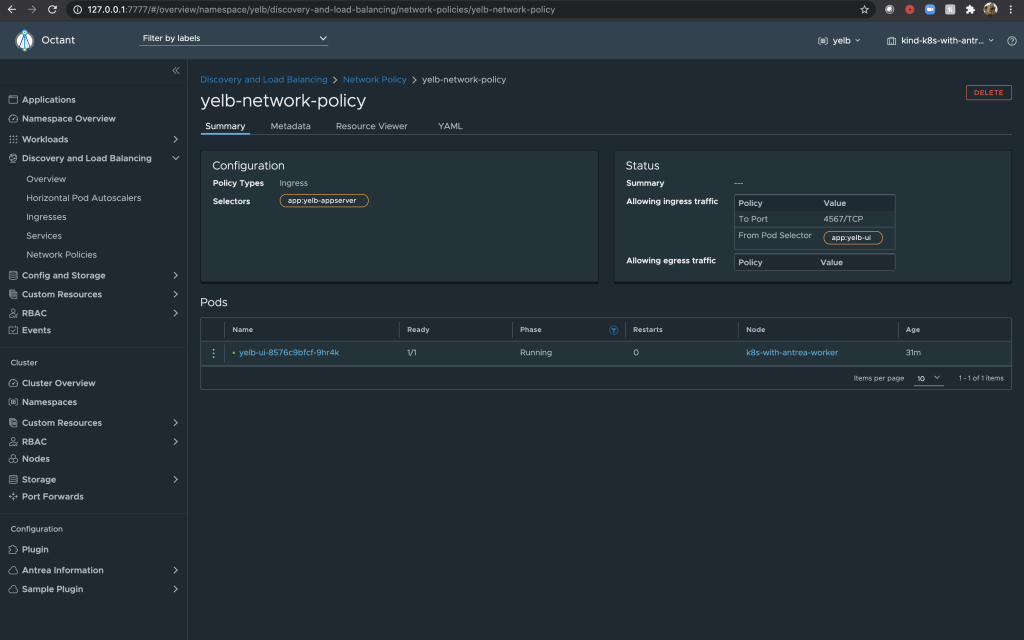
We can see the NetworkPolicy in Octant as shown below. (type “octant” in your Terminal to access Octant)
Useful Commands
Install antctlcurl -Lo ./antctl "https://github.com/vmware-tanzu/antrea/releases/download/v0.7.0/antctl-$(uname)-x86_64"
chmod +x ./antctl
mv ./antctl /some-dir-in-your-PATH/antctl
Troubleshooting commandsantctl get controllerinfo
antctl get networkpolicy [name] [-n namespace] [-o yaml]
antctl get appliedtogroup [name] [-o yaml]
antctl get addressgroup [name] [-o yaml]
antctl version
antctl supportbundle
Thank you for reading!

This is the perfect web site for anyone who really wants to find out about this topic. You know a whole lot its almost tough to argue with you (not that I really will need to…HaHa). You definitely put a new spin on a topic which has been discussed for many years. Great stuff, just great!
LikeLike