
In this blog I will show the steps needed to integrate NSX Advanced Load Balancer (NSX-ALB) previously known as Avi with NSX-T Data Center.
NSX-ALB is a multi-cloud Software Defined Load Balancer. It includes great feature such as analytics, GSLB, WAF, and Kubernetes Integration.
In This blog i will show how deploy and integrate NSX-ALB with NSX-T in a vSphere environment.
NSX-ALB Consists of two main components, the Controller and the Service Engines (SE). We only need to deploy the Controller, while the SEs will be deployed automatically. The NSX-ALB (Avi) Controller does not handle any data plane traffic.

Assumptions:
1. vSphere is deployed including vCenter
2. NSX-T Manager is deployed, integrated with vCenter, hosts are prepared, NSX-T edge and a T0-GW are deployed, and the T0-GW is paired with the physical Network using BGP.
The first thing we need to do is download NSX-ALB Controller OVA from https://customerportal.avinetworks.com/
i am using NSX-ALB 20.1.2 in this blog.
Then we need to deploy NSX-ALB Controller OVA on vSphere, this a standard OVA deployment so i am not showing those steps here.
Go to the IP Address as configured in the OVA Setup, you should get below page. we need to create a new password.

Configure DNS and NTP settings

Pick your Infrastructure. In this case it is vSphere

Configure vCenter IP address and Credentials. For the SDN Configuration, please choose None.
Don’t pick VMware NSX, we will configure that later

Pick your vSphere Data Center

Select the Management Network. Below Management Network and IP Address Pool will not be used with NSX-T Integration, but i am configuring them in case we need to add a SE outside of NSX-T scope.

No Multiple Tenants

We are done from the Controller initial setup.
Because i am using NSX-T for Network and Security Virtualization. i am going to add it as a Cloud to simplify operations, but first i will create some objects in NSX-T to attach the NSX-ALB Service Engines (SE) automatically and achieve below topology. i am using a dedicated Segment for the SEs Mgmt and another one for the Data.

For more design information https://avinetworks.com/docs/20.1/nsx-t-design-guide/
First lets create two T1-Gateways, one for NSX-ALB SE Mgmt, and another one for Data which will be used for the Load Balancing VIPs.


(Make sure to advertise Connected Routes under Route Advertisement in both T1-GWs)
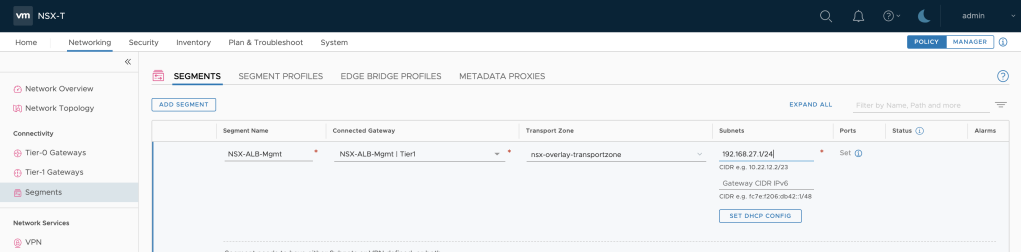
Now lets create two L2-Segments, one for NSX-ALB SE Mgmt, and another one for Data, and attach them to the respective T1-GWs

Now we are ready to add NSX-T as a cloud in NSX-ALB
Infrastructure>>Clouds>>CREATE>>NSX-T Cloud
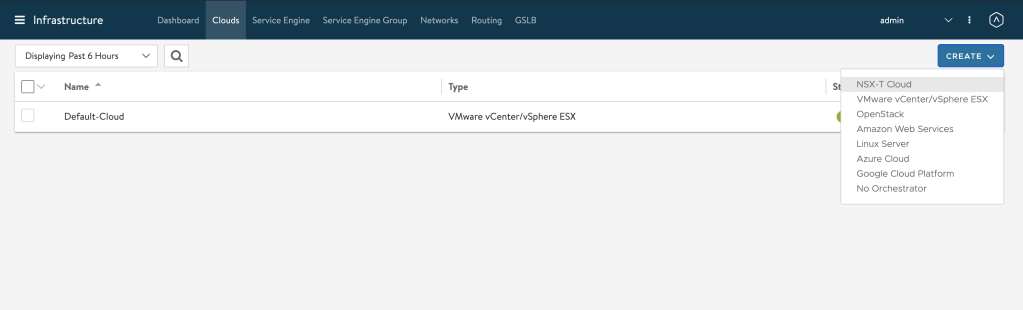
You can configure NSX-T Cloud as shown below. For the Transport Zone, (TZ) we need to pick our Overlay-TZ, and for the Mgmt and Data Logical Routers and Segments we should pick what we configured in our previous step. An empty Content Library needs to be created in vCenter before this step to populate the SE OVA.
The IPAM Profile will be added later.

Add vCenter where we want to create our Service Engines automatically. If we have vCenter already integrated with NSX-T, we should find vCenter IP address in the drop down menu. For the Content Library, an empty Content Library should have been created in vCenter and chosen here. The controller will upload the SE VM Template in this content library automatically.

Before configuring Applications, there are some house keeping steps we need to do.
First we need to go to Infrastructure>>Network, and then pick NSX-T Cloud and configure the Networks with the right Subnets

For NSX-ALB-Mgmt, we need to configure the subnet and add a static pool. we could use NSX-T DHCP as an option too.

for NSX-ALB-Data, we should do the same

They should look like below,

Now I will create an IPAM Profile to assign the Virtual Services IP Addresses Automatically
Templates>>Profiles>>IPAM/DNS Profile

Select the IPAM Profile in the NSX-T Cloud
Infrastructure >>Cloud>>NSX-T Cloud

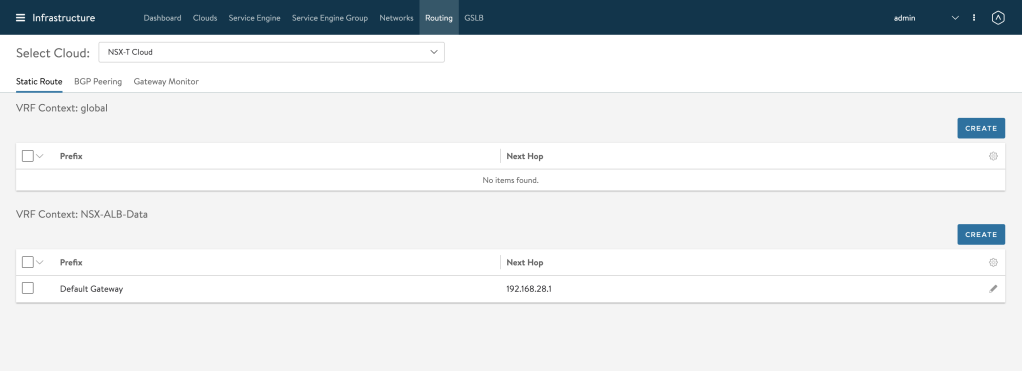
Now lets add a Default Route for the Data Segment so the SEs could route traffic to any workloads even if they are not on the same Segment. The default Route will point to the NSX-ALB-Data T1-GW Interface
Infrastructure>>Routing>>Create (pick NSX-T Cloud in the top)

It should look like below,
Now we are ready to create our first Virtual Service (VS). We can look at a VS in NSX-ALB as a combination of a VIP + Server Pool. Because we have NSX-T already integrated, all what we need to do is pick a Data T1-GW and our Servers that we want to load balance the traffic to. The rest could be left to the defaults. once we do that, a Service Engine will be created automatically for us.
Applications>>Virtual Services>>Create Virtual Service>>Advanced Setup

Select NSX-T Cloud

Configure the Virtual Service as shown below,

Create a Pool as below, for the pool we need to pick same T1-GW, and add an Active Monitor.
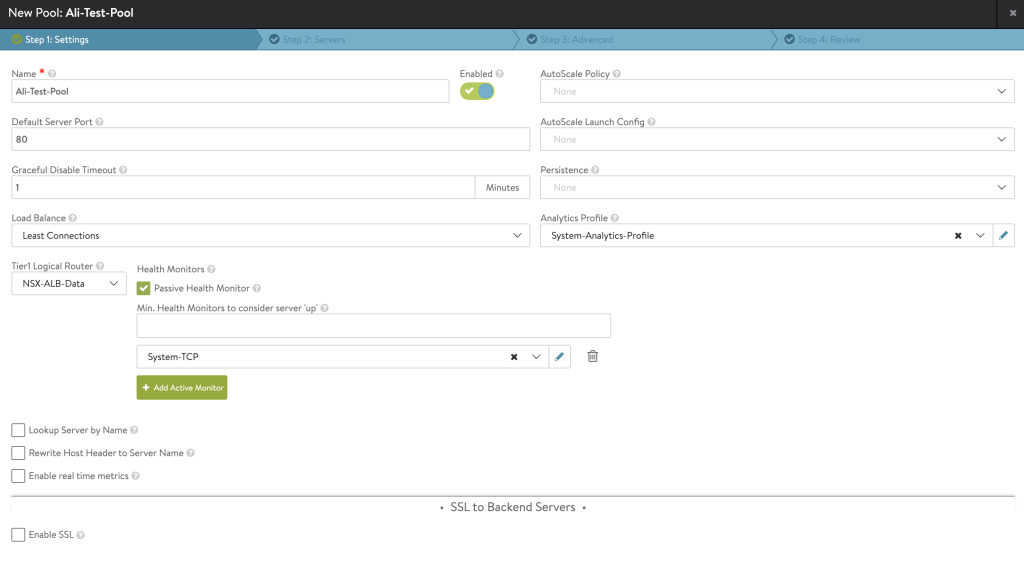
Click Next to add the Servers
I am only adding one Ubuntu web server for the sake of testing, after that we could leave other steps as defaults in the Pool config

We can leave other steps in the Virtual Service config as defaults and save.
NSX-ALB will deploy a Service Engine Automatically in vCenter. we should give it some time for this task to finish.
After the SE is deployed, the VS should look like below


And the Web Server could be accessed using the VIP

To understand the Traffic flow, i am using NSX-T automated Network Diagram,

And that conclude the NSX-ALB Deployment and integration with NSX-T.
In this blog I showed how to deploy NSX-ALB and integrate with NSX-T. by doing that we can automate the deployment and scaling of NSX-ALB SEs which simplify the operations and traffic routing. In my next blog I will show how to extend this architecture to Kubernetes to provide Ingress to Containers workloads.
Thank you for reading!

Hi, Possible share ova for testing?
LikeLike
Hi JC, NSX-ALB OVA could be downloaded from https://customerportal.avinetworks.com/. If you need help in that, then please reach out to a VMware Sales representative in your country.
LikeLike
Admiring the dedication you put into your blog and in depth information you offer. It’s nice to come across a blog every once in a while that isn’t the same out of date rehashed information. Excellent read! I’ve saved your site and I’m adding your RSS feeds to my Google account.
LikeLike
Thanks. I really enjoyed work you put in on this. I tried this out in my lab. I was unable to get VS created properly. The SE would deploy but would not connect to Controller. I did see somewhere that a static route should be created on T1 but that is not happening. Was wondering if you have any idea of what I may have missed. I used same configuration with regards to IP addressing for NSX-T environment. I do have BGP configured on NSX-T T0 gateway. Any help would be greatly appreciated.
LikeLike
Thank you for your comment. If the SE cannot reach the controller, it is a management plane connectivity. This could happen for multiple reasons depending on where is your management network. In this blog I configured the management network on a VDS dPG, but you could do it on an NSX-T segment too. If you used an NSX-T segment, then you just need to make sure this network is advertised (redistributed) into BGP.
LikeLike